|  | Topic : HOW TO REQUEST: Rear Brake Pad Swap |  |
| | | narsisco_lopez | | Thor |  |  | | Reg. Date | : | 09/09/2010 | | Posts | : | 2,765 | | Location | : | Golden (Showers!), Colorado, United States |
|
| | Posted : 19 Aug 2011 - 22:11 Post title : Re: HOW TO REQUEST: Rear Brake Pad Swap (Re: Linkdog) | | |
Linkdog wrote:
narsisco_lopez wrote:
feduke wrote:
After reading all this I have even more respect for my mechanic. He did the whole thing by himself slicker than owl sh** in just a few minutes. I'll have to ask him what his secret is. |
|
My question to you, Feduke, is... how in the hell do you know how slick owl shit is?  |
|
I think it's like K Y only with feathers |
|
Reminds me of the old joke...
Question: Why did the pervert cross the road?
Answer: His dick was in a chicken.
| 2012 Storm (SOLD!)
Other Bikes:
2003 Suzuki DRZ400E (plated - my dual sport/mountain trail/camping bike)
Past Bikes:
2012 K13S
2009 KTM 990 Adventure
2010 Triumph Thunderbird 1600 (the Alien Queen)
2009 Triumph Sprint ST (another great bike!)
2007 Kawasaki ZX10R
2000 Kawasaki ZRX1100
1975 Honda SB550T "Clubman"
1981 Kawasaki KZ1000J
1985 Suzuki GS550E
1978 Yamaha 650 Special
|
|
| | | Linkdog | | Thor | |  | | Reg. Date | : | 10/02/2011 | | Posts | : | 2,923 | | Location | : | Groveland, FL., United States |
|
| | Posted : 19 Aug 2011 - 23:54 Post title : Re: HOW TO REQUEST: Rear Brake Pad Swap (Re: narsisco_lopez) | | | narsisco_lopez wrote:
Linkdog wrote:
narsisco_lopez wrote:
feduke wrote:
After reading all this I have even more respect for my mechanic. He did the whole thing by himself slicker than owl sh** in just a few minutes. I'll have to ask him what his secret is. |
|
My question to you, Feduke, is... how in the hell do you know how slick owl shit is? |
|
I think it's like K Y only with feathers |
|
Reminds me of the old joke...
Question: Why did the pervert cross the road?
Answer: His dick was in a chicken. |
|
 You're twisted mate You're twisted mate
| Never drink from a cow with one udder! 2010 1600 Blue&White ( of course ) Long TORS and HP filter. 2010 1600 Blue&White ( of course ) Long TORS and HP filter.
| | Post edited by Linkdog on 19 Aug 2011 - 23:55 |
|
| | | feduke | | Thor | |  | | Reg. Date | : | 11/08/2009 | | Posts | : | 2,441 | | Location | : | Daytona Beach, Florida, United States |
|
| | Posted : 20 Aug 2011 - 01:43 Post title : Re: HOW TO REQUEST: Rear Brake Pad Swap (Re: Linkdog) | | | I'm pretty sure that's what the Druids used for a sexual lubricant so it must be slick. It made the women see better at night too. Try some in your TBird and let me know how it works out.
Just so you know, that KY Jelly tastes awful on toast!
| I'm a secondhand vegetarian. Cows eat grass. I eat cows.
| | Post edited by feduke on 20 Aug 2011 - 01:45 |
|
| | | zolti | | Thor | |  | | Reg. Date | : | 23/03/2010 | | Posts | : | 3,127 | | Location | : | newcastle , United Kingdom |
|
| | Posted : 20 Aug 2011 - 06:05 Post title : Re: HOW TO REQUEST: Rear Brake Pad Swap (Re: narsisco_lopez) | | |
narsisco_lopez wrote:
Question: Why did the pervert cross the road?
Answer: His dick was in a chicken. |
|
thats a "foul" joke
|
|
| | | John | | Set | |  | | Reg. Date | : | 20/05/2012 | | Posts | : | 84 | | Location | : | Aylesbury, Buckinghamshire, United Kingdom |
|
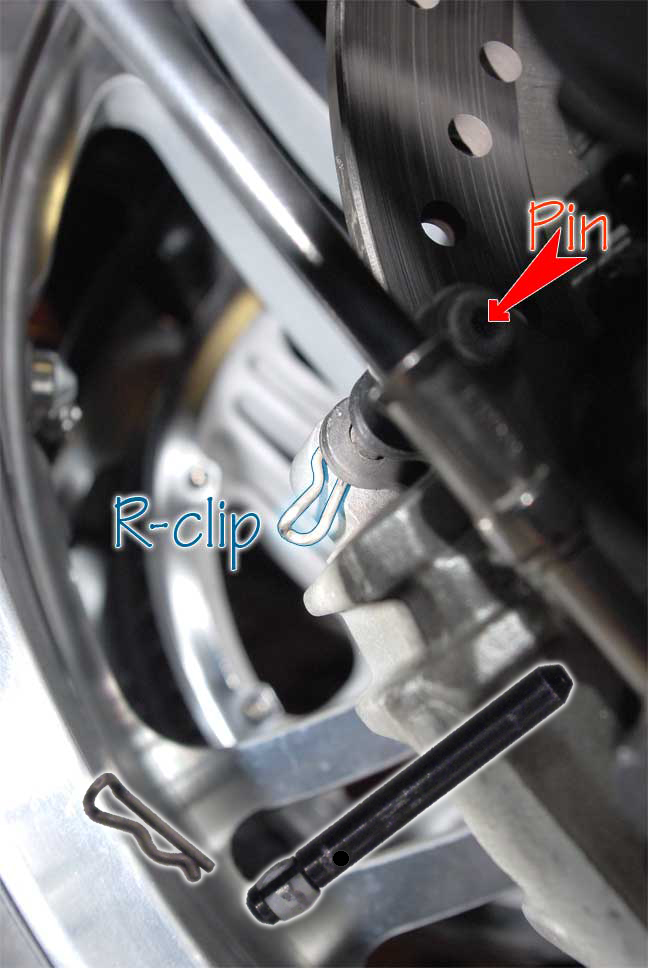
| | Posted : 23 Mar 2013 - 23:13 Post title : Re: HOW TO REQUEST: Rear Brake Pad Swap (Re: BigJack) | | | Changed my rear brake pads today with the rear wheel on and thought that this might help others in time.
If you have long pipes you are going to have to remove the one obscuring the calliper.

You then need to remove the pin clip on the LHS of the calliper as shown.

It just pull out like this.

You can then drive the pin out from the outside into the wheel. I could not see how to do this first as the access is not good. In the end I worked out that if you remove the rubber exhaust mounts and use something that fits in the hole on the calliper. The only thing I could find was an M4 brass screw.

Once the pin has been tapped out you can pull the pads out sideways.
To retract the pistons in order to get new pads in I put the calliper side pad in and gently pushed the calliper into the disk, as the calliper is floating it slowly pushes the pistons back. If you've topped up the brake fluid reservoir previously you will need to open the bleed nipple and use the other method mentioned in this thread. When you have pushed the pistons into the calliper the other set of pads will slide into place.

The pin then gets put back in. I cleaned off the head of the pin (RHS in picture) and put a black line on it indicating where the hole is, so when I drifted it back in you can tell where the hole is for the pin clip to locate as its not easy to see much on the bike. You will need to put some pressure on the pads / springs to align the holes so the pin can be slid in. I spend a while trying to work out why the pin clip would not go through the hole fully and realised it needs to be inserted so you are pushing the pin in from the top at approx. 12 o clock, its important to ensure it clips in properly, you dont want it to fall out on the move!
I didn't want to put any copper slip on the back of the pads as its too easy to contaminate the brake lining. Its also not easy to clean the calliper as its pretty inaccessible in situ. I only did it this way as the bikes going in for a service next week and they will strip the calliper as part of the routine service.
I've been through 2 sets of OEM rear pads in 11,000 miles but these are Ferodo sintered pads so who knows!
Personally I would only do this on the bike every other change as you really need to get into the calliper to clean and grease things.
Hope this helps. The whole thing took me 2 hours, but now I know whats going on I reckon 30 mins! 
| Addicted to the TBird 
|
|
| | | davetac1 | | Thunderbird | | | Reg. Date | : | 06/09/2010 | | Posts | : | 8,379 | | Location | : | Haverhill, Ma., United States |
|
| | Posted : 24 Mar 2013 - 00:29 Post title : Re: HOW TO REQUEST: Rear Brake Pad Swap (Re: John) | | | If I may add something to this procedure:
Clean that pin thoroughly,so it's nice and shiny.Then lightly coat it with never seize or equivalent "BEFORE" ya put it back in as the pads slide on it.And don't forget the little metal shims on the other end of the caliper which the other end of the pads also slide on, as they too need to be cleaned and lightly lubed before the pads are slipped backed into place.You'll discover that the brake will work a lot better.
And BEFORE the pistons are pushed back into their bores,ALWAYS,open the bleeder first,so the old contaminated brake fluid in the caliper will dump out there,rather then forced back up thru the system.Then close it.This applies to "ALL disc brake systems in "ALL disc brake equipped vehicles.Then slowly pump the pedal/lever,not letting it drop more than half way, until it gets firm.Then top off the reservoir[s] being care full NOT to overfill it/them. I think you'll find that your bike/car will stop a lot better,not to mention the pads will last a lot longer. Dave!!! Dave!!!
| | Post edited by davetac1 on 24 Mar 2013 - 00:33 |
|
| | | surfing72 | | Set | |  | | Reg. Date | : | 20/03/2012 | | Posts | : | 483 | | Location | : | Nth, New South Wales, Australia |
|
| | Posted : 13 May 2013 - 03:28 Post title : Re: HOW TO REQUEST: Rear Brake Pad Swap (Re: John) | | | Great easy to follow thread.
I just swapped over my rear pads in abut 20 minutes.
Easy job for any one.
I didn't even remove the exhaust - only the rear bolt and rubber bush and left the exhaust attached
Thanks,
Dan
Now onto the front pads???
| Dan
|
|
| | | John | | Set | | | | Reg. Date | : | 20/05/2012 | | Posts | : | 84 | | Location | : | Aylesbury, Buckinghamshire, United Kingdom |
|
| | Posted : 13 May 2013 - 06:45 Post title : Re: HOW TO REQUEST: Rear Brake Pad Swap (Re: surfing72) | | | You're welcome surfing72 Leaving the exhaust on is something I'll try next time.
| Addicted to the TBird
|
|
| | | mat1600 | | Thunderbird | |  | | Reg. Date | : | 06/03/2010 | | Posts | : | 8,596 | | Location | : | Bridlington, Democratic Independant State of Yorkshire, United Kingdom |
|
| | Posted : 13 May 2013 - 08:01 Post title : Re: HOW TO REQUEST: Rear Brake Pad Swap (Re: surfing72) | | |
surfing72 wrote:
Great easy to follow thread.
I just swapped over my rear pads in abut 20 minutes.
Easy job for any one.
I didn't even remove the exhaust - only the rear bolt and rubber bush and left the exhaust attached
Thanks,
Dan
Now onto the front pads??? |
|
10 mins max for the front.
| My first natural instinct is to breathe. My second is to evade tax's.
|
|
| | | GerPa | | Jupiter | |  | | Reg. Date | : | 10/12/2011 | | Posts | : | 1,919 | | Location | : | Mackay, Central Queensland, Australia |
|
| | Posted : 24 May 2013 - 06:32 Post title : Re: Rear Brake Pad Swap Results | | | Just a bit of info for everyone.
Just changed My rear pads out at 14,380 Klms and from a on bike inspection I was of the opinion that they wouldn't go much further. On reflection once I had them out I might of got about another 3 or 4k out of them  . .
For ease of getting at things and being able to easily see what I was doing I removed the LH Shortie and it's rubber mount to drive the pad retaining pin out.
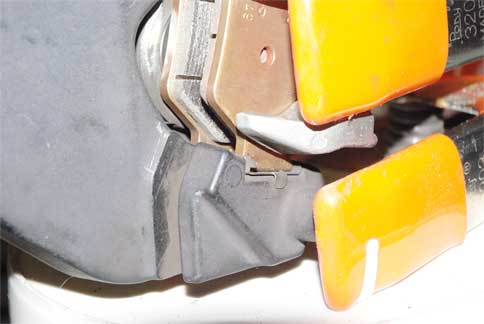
What is depicted below is what you see of the remaining pad thickness when you inspect the pads on the bike from behind, which give the impression that they are getting pretty low.

The new Sintered Pads that I fitted were of 4mm Thickness.
This view below is of the amount of lining remaining on the individual pads compared to original. My experience is that usually the stationary or fixed pad ( in our case the pad closest the wheel) generally wears the most and that is evident below.

Gerry D
|  May-2011-1600, 20306 Tune, Mustang Vintage Solo Seat, Meerkat Cat Bypass, + Meerkat Modified Short TORS May-2011-1600, 20306 Tune, Mustang Vintage Solo Seat, Meerkat Cat Bypass, + Meerkat Modified Short TORS  ,K&N Air Cleaner,K&N Oil Filter, JBQ lifting system, Gold Plug Magnetic Sump Plug,Dart Fly screen, Rivco Risers, GiPro Gear Indicator, Breakaway Cruise Control, Avon ISO Grips, Scorpion Western Low Handlebars, Kury Switchblade Pegs, Garmin Zumo390LM,Michelin RC2 on Front RC 3 on ,Modified Rear Drive Pulley Hub Bearings (Mat1600/Alex4 Modification) Front Susp: Std & 7.5W Oil /126mm Air Gap & Rear:Hagon Nitro's with 26Kg/cm Springs + Lots of other "Bling" stuff. ,K&N Air Cleaner,K&N Oil Filter, JBQ lifting system, Gold Plug Magnetic Sump Plug,Dart Fly screen, Rivco Risers, GiPro Gear Indicator, Breakaway Cruise Control, Avon ISO Grips, Scorpion Western Low Handlebars, Kury Switchblade Pegs, Garmin Zumo390LM,Michelin RC2 on Front RC 3 on ,Modified Rear Drive Pulley Hub Bearings (Mat1600/Alex4 Modification) Front Susp: Std & 7.5W Oil /126mm Air Gap & Rear:Hagon Nitro's with 26Kg/cm Springs + Lots of other "Bling" stuff.
| | Post edited by GerPa on 24 May 2013 - 20:13 |
|
| | | davetac1 | | Thunderbird | | | Reg. Date | : | 06/09/2010 | | Posts | : | 8,379 | | Location | : | Haverhill, Ma., United States |
|
| | Posted : 24 May 2013 - 15:57 Post title : Re: Rear Brake Pad Swap Results (Re: GerPa) | | | Just alittle FYI:The pads will only go in one way and don't have to be marked to figure out which one goes where.However,I have known guys who attempted to put brake pads in all kinds of different ways, which,needless to say,didn't work. But then again,if ya put the pad in with the metal part facing the rotor! which,needless to say,didn't work. But then again,if ya put the pad in with the metal part facing the rotor!  Dave!!! Dave!!!
| | Post edited by davetac1 on 24 May 2013 - 16:01 |
|
| | | davetac1 | | Thunderbird | | | Reg. Date | : | 06/09/2010 | | Posts | : | 8,379 | | Location | : | Haverhill, Ma., United States |
|
| | Posted : 25 May 2013 - 11:00 Post title : Re: Rear Brake Pad Swap Results (Re: GerPa) | | | In Gerry's first illustration of his rear pads resting against one another,note that the pad on the right is thinner then the pad on the left,suggesting that the pads are or were, hanging up in the caliper,or,the pistons were not releasing back into their bores properly.That's why it's important that the back side of the caliper where the pads ride, is clean and lubed as well as that pin in front where the pads slide on.I mean,Gerry's pad wear isn't bad,but ya still wanna see em wear as evenly as possible.The more evenly they wear,the more efficiently the machine will stop, not to mention,a longer pad life. Dave!!!
|
|
| | | MotorMac | | Jupiter | |  | | Reg. Date | : | 29/08/2010 | | Posts | : | 1,792 | | Location | : | Nor Cal, United States |
|
| | Posted : 15 Sep 2014 - 02:27 Post title : Re: This site is like having friends at the factory! | | | Thank you one and all for turning a first-time brake job into a piece o'cake.
Front pads were super easy and quick. Rear brake not so much, due in large part to location of that Brembo pin. Used a too-small pin punch at an angle (Mat and Dave et al are cringing about now) GENTLY tapping with a hide mallet to loosen pin a bit, then stuffed a 1/8" x 1.5" roll pin in there and used reverse pliers against muffler mount to squeeze pin out.
Pin rotates freely when installed, so replacing R-clip was easier than expected, too. (Mine was pretty clean.)
View from ground looking up toward rear past brake line.
Had to drain fluid to fit new pads, but was going to drain/replace fluid anyway. Inner pad was _very_ close to gone.
Oh yeah, hey Dave!!! Dot 4 brake fluid is - you guessed it - synthetic! ;-)
| 
|
|
| | | davetac1 | | Thunderbird | | | Reg. Date | : | 06/09/2010 | | Posts | : | 8,379 | | Location | : | Haverhill, Ma., United States |
|
| | Posted : 15 Sep 2014 - 17:33 Post title : Re: This site is like having friends at the factory! (Re: MotorMac) | | | Yes it is synthetic,but it's also brake fluid, NOT motor oil.However!! I got an idea!! Why doncha try runnin some of that same synthetic fluid in your motor too!Then we'll see just how nice the motor runs after that.I'll betcha your motor will NOT be as quiet as when runnin that inferior stuff I use!!. Infact,I'll betcha the motor will sieze up tighter then a bull's ass at fly time! And in record time to boot. Dave!!!
| | Post edited by davetac1 on 15 Sep 2014 - 18:15 |
|
| | | MotorMac | | Jupiter | | | | Reg. Date | : | 29/08/2010 | | Posts | : | 1,792 | | Location | : | Nor Cal, United States |
|
| | Posted : 15 Sep 2014 - 18:12 Post title : Re: This site is like having friends at the factory! (Re: davetac1) | | | You know I'm just teasing, right? Nasty stuff brake fluid, no matter what kind/dot it is.
Just ordered a pair of Dorman #12705 "Speed Bleeders" (M8-1.25 x 28mm, same dimensions as stock bleeder screws).
Link
Really simple product, has a check ball in it so you don't have to open/close bleeder. Just open it, keep reservoir full and pump away.
Question for ya:
Manual says to remove RH caliper and bleed both calipers thru the RH side. Presumably, keeping it higher than LH will bring any air to it, right? If each side had a speed bleeder, couldn't you bleed both simultaneously without removing RH caliper?
|
|
|
| | | davetac1 | | Thunderbird | | | Reg. Date | : | 06/09/2010 | | Posts | : | 8,379 | | Location | : | Haverhill, Ma., United States |
|
| | Posted : 15 Sep 2014 - 21:00 Post title : Re: This site is like having friends at the factory! (Re: MotorMac) | | | I've always bleed MC brake calipers while still mounted, on all the bikes I've owned and or worked on and never had a spongy pedal/lever,or a problem after,with any of em.So the answer is,as long as the bleeder screw is higher then the caliper is in its' mounted position,I bleed em right in place. Dave!!!
| | Post edited by davetac1 on 15 Sep 2014 - 21:02 |
|
| | | MotorMac | | Jupiter | | | | Reg. Date | : | 29/08/2010 | | Posts | : | 1,792 | | Location | : | Nor Cal, United States |
|
| | Posted : 16 Sep 2014 - 04:23 Post title : Re: This site is like having friends at the factory! (Re: davetac1) | | | You've got to like the Speed Bleeder idea. Fast eddy has 'em. Makes it a one-man job and simplifies everything. Plus, they're part of the bike.
As to rear pads, it _is_ best to remove wheel and do as Mat (and the manual) says, and here's why:
Had inner pad climb out of caliper the first time I backed up, had to remove wheel and do it right because I failed to trap bottom of inner pad in caliper. That clip behind pads wants to spring out, too - and a good cleaning doesn't hurt.
|
| | Post edited by MotorMac on 16 Sep 2014 - 18:41 |
|
| | | jjc1957 | | Set | |  | | Reg. Date | : | 03/06/2013 | | Posts | : | 165 | | Location | : | Rehoboth, MA, United States |
|
| | Posted : 02 Oct 2014 - 12:34 Post title : Re: HOW TO REQUEST: Rear Brake Pad Swap (Re: Linkdog) | | | Thanks everyone for this info, really helped out on last nights brake job. The pin was hard to remove on the rear brake but I got it. No problem with the fronts. Now tires, fork oil, oil & filter change, clean and oil K&N air filter, front fender extender and some wiring. All this right after my dealer 24,000 full service. Does it ever end.
| 2010 Tbird 1600 SE No cat K&N Air Filter, Hog Slayers Exhaust, 20306 Map, Mustang Seat, Driving Lights, Front Dresser Bars, Highway Pegs, Heat Controller, GPS, & more
|
|
|
| |
| |
|